Saturday, July 30, 2016

Life is Just a Chair of Bowlies

I have already registered for a tree for the Festival of Trees.  So I'm committed now.

I wasn't going to do a Festival of Trees this year.  I was going to concentrate on other charities, however, as I mentioned at the first of the year, I got an idea.  A horrible.  Awful.  Idea.

What if I did a tree based on the artwork of Mary Englebreit?  Oh, that would be soooo cute.  I love her artwork.  I'm always snapping up her calendars. 

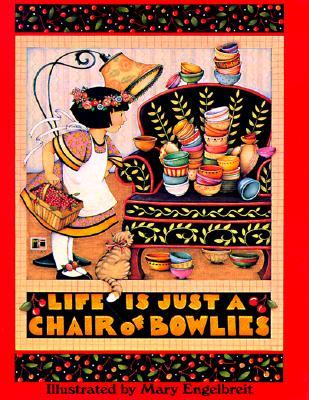
And if I did do this tree, wouldn't be a hoot to re-create "Life is Just a Bowl of Cherries."


 I gushed and laughed over the idea.  But no.  I'm not doing a Festival of Trees tree....

Never go to Home Goods when ideas are floating around in your head.  Because then you are sure to find...


So, yes, I bought it, brought it home, wrapped it up in plastic and stuck it under a table in my office while I went on a spending binge at Amazon.com, Wal-mart and E-bay.  It was February and I was buying Christmas stuff!

So, here is my make-over.  I discovered spray on fabric dye.  I have never used the stuff before and thought I knew what I was doing.  I had plan A all mapped out.  I'd purchased some stuff on line and ran some tests.  OK.  I'm prepared, but instead of a black chair, like it is in the picture, I planned to make it dark green.  Thought that might be more Christmasy.

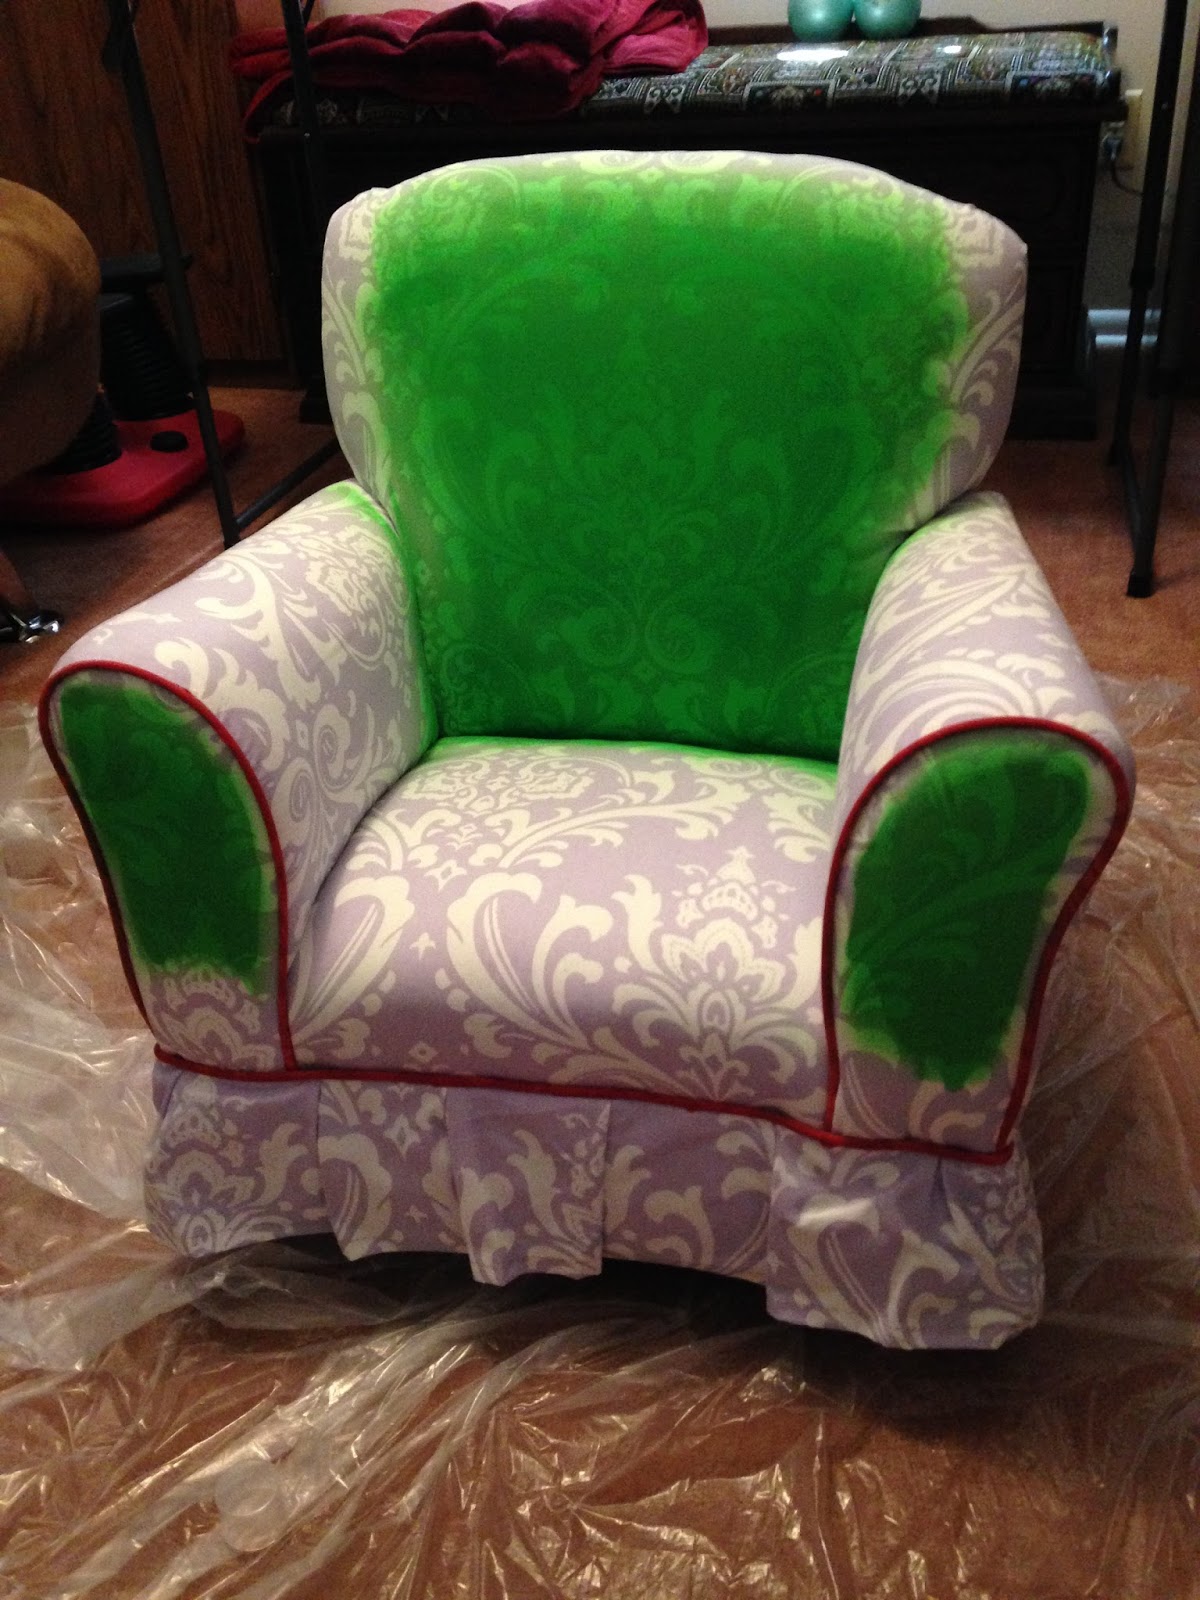
I started by painting the piping red, just like it is in the picture.  Instead of using the spray, this I painted on with a brush, for better control.


I used packing tape to protect the existing fabric.  When the piping was painted, I then did a background color of light green, for the greenery on the chair.  We now look like this.


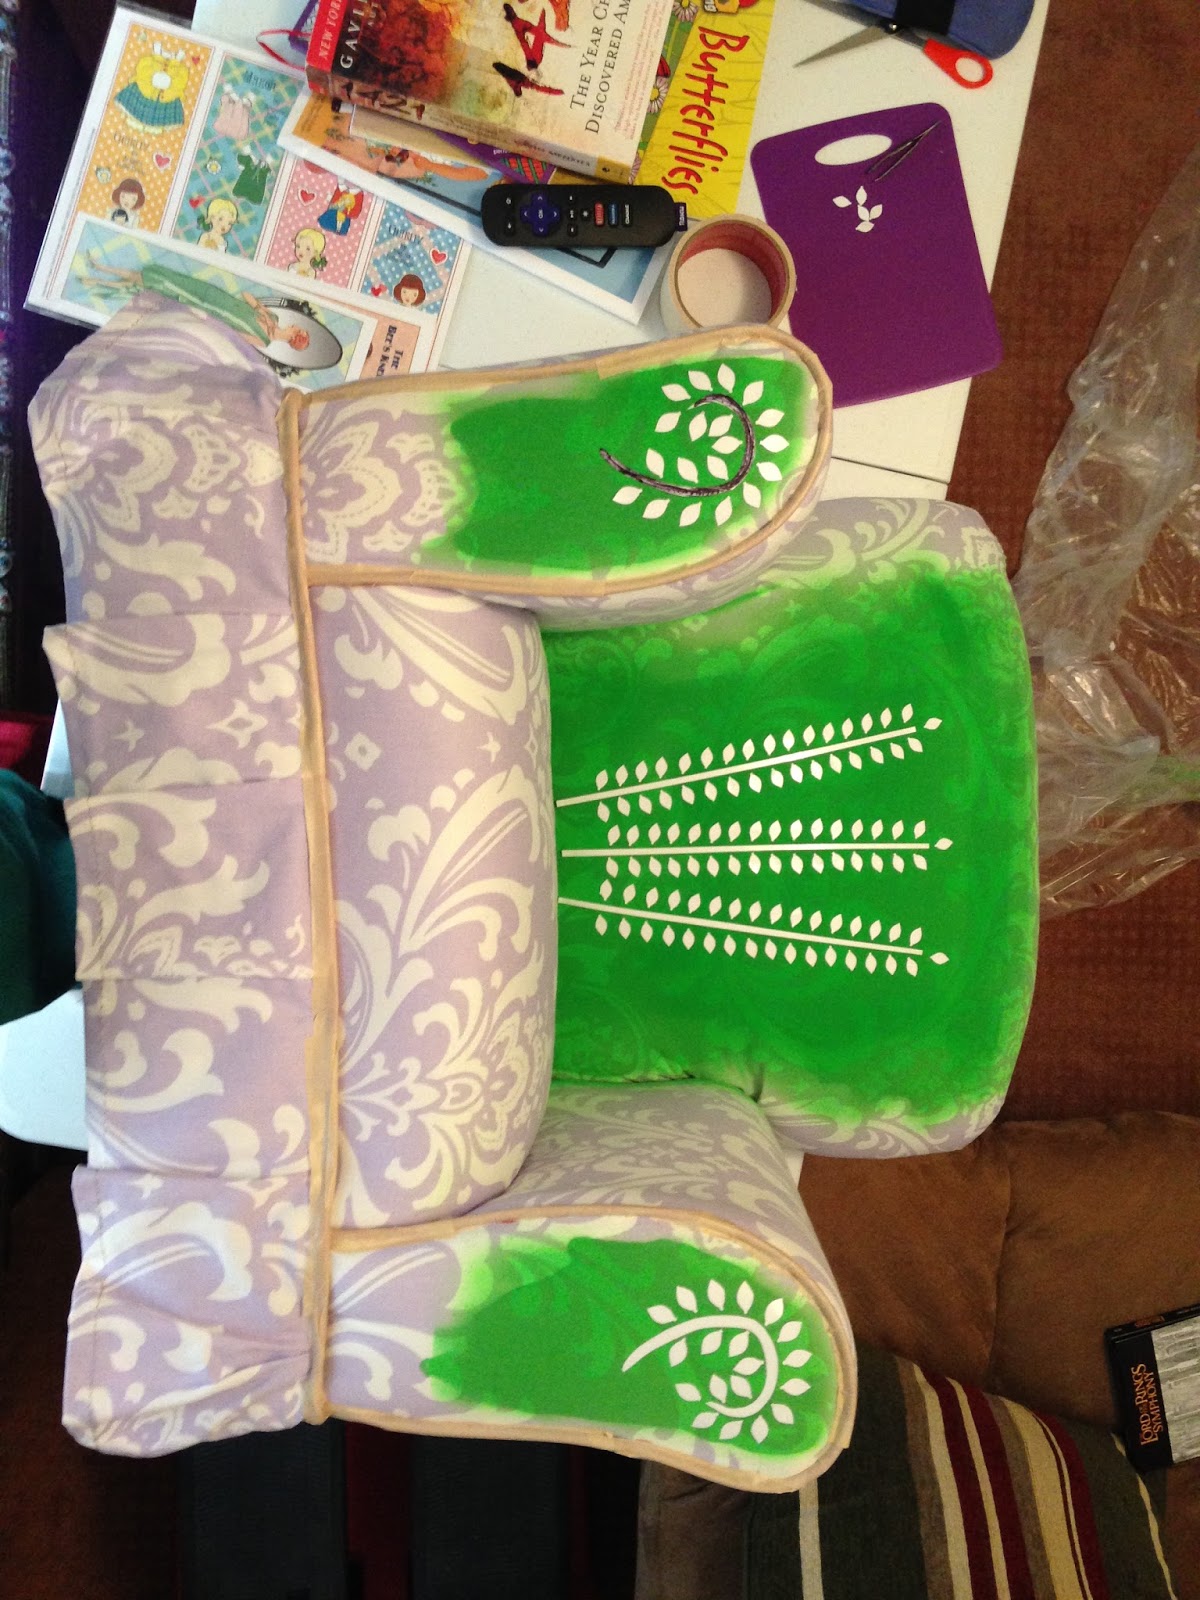
I had purchased a specialty paper punch of a small leaf.  This was a method that did and didn't work.

I placed the clear packing tape on top of label paper that had an adhesive background.  I made slices for the stems and hand drew the curly stem, paper punching the leaves.


Very carefully, I placed my stickers on the chair.  Originally, I was only going to do three stems on the back of the chair.


I put masking tape over the red piping and got out my dark green spray dye.  I didn't  have enough!  Plan B.  I ran to JoAnn's Fabric store where I had bought the red dye.  They had emerald green spray paint - but - horrors, it was sparkly. 


AND I had splotches from the earlier green dye.  This was a disaster!  Plan C!  I added two more rows of stems and leaves to match the original.


I ran to JoAnn's again and this time bought black fabric paint that is applied with a brush.  It was dark and gooey, reminding me of something out of an oil can, but thicker.  I painted it on all over.  I later found out I could have thinned it with water.


When the paint was dry, now came the reveal.  It was time to take the stickers off.  Rats.  Another disaster.  For the most part, the paper had stuck to the underlying paint.  I couldn't get it all up, but left a regular paper trail.


Plan D.  Back to JoAnn's and this time I bought the old fashioned Tulip slick stuff in a big bottle, to make sure I had lots.


I kept telling myself to be patient, but I struggled with maintaining a steady hand as I painted in the stems and leaves with green goo.  Finally, I just decided, it didn't have to be perfect.  It just had to be DONE!  Once I removed all the masking tape from the piping, I used a paint brush to fill in the gaps and do touch ups.

Today, July 30, 2016 it is finished!  Here is the before and the after.


And that is all I am going to say about that!

Next - Tea for Two with a Cherry on top.  Also for Festival of Trees.


I tell ya!  Home Goods is dangerous when your brain is cooking up ideas.


Saturday, May 21, 2016

The Broken Angel

 
Welcome back.  Above is my latest project.  And I really liked  how she turned out.  As I showed you last time, she apparently, at one time had wings, and they broke off.

 
So how was I going to fix this?  Well, let me tell you, porcelain is VERY HARD!  I had to start with a hammer to get the jabby part off.


Then I tried using this little file, and it worked, but it was ooohh, so slow.  So I went to Lowe's and bought some metal files.  Well, the file side hardly worked at all.  I had to use the edge of the file and chip, chip, chip away for many session.  I couldn't hit against the porcelain too hard.  I didn't want to break it.  So it was chip, chip, chip away.  I literally made dust.


I finally got it down to the point where I could now start filling in the holes from the original breakage.  I love spackle.  It's easy to work with and dries fast.  When that was dry, the small files now made sense, but I still had an uneven surface that I would have to camouflage with paint and texture.  Spackle isn't perfect.

A couple of months ago, I had seen the BYU Ballroom Dance Company perform.  In one number, the ladies wore these beautiful apricot colored costumes.  They were stunning.  I wanted something soft for my broken angel and went with that color.  I chose a mint green as the counter color for the shawl.  Then I took an old, crummy splayed brush and tried to give the bodice and bottom trim a kind of brocade look.  Over that was a sparkle glaze.  Looking at the back, you can't tell it had been a rather rough surface.


The little red spots are actually the sparkle glaze.  They are really shiny in sunlight.  I also added little dabs of sparkle to the shawl.

I chose to give her honey brown hair; soft hair color to go with soft, pastel colors.  I think it worked.  Once again, I used real make up blush, applied with a Q-tip to.  I love it.

 
And here she is, all finished, before and after - the back side and the front side.


I added some little cushions on the bottom and my new sticker:  Repainted 2016 by Meralee Stallings.  Then I gave it my initials to add to the information on the bottom. 


I feel like this has been my best work thus far, so I gave it to my Mom for Mother's Day.  She hates having her picture taken, but I took it anyway.  Smile Mom!  She was even wearing a matching blouse.


Next time - Little Boy Green is going to become the Golden Boy!  I bought him at D.I. for about $1.50.  I'm sure he had a kissing partner, but she wasn't there.  Now, it's just him, looking for a kiss.


Saturday, April 30, 2016

Little Green Angel

I thought this one would be soooooo easy!  She was mostly done!  I bought her at Deseret Industries thrift store for $1.00.  She was glazed all over, but her face was literally green too.  And, once again, not painted well.  Too much spill over into the hair.  This will be soooooooo easy!


Well, what did I know!  True, painting the face and hair did not take that much time.  At this time, I was still looking for a decent brush to do small work with, so the eyebrows and eyes are not as dainty as I would like.  I've actually considered plucking the whiskers off of one of my cats to make my own little tiny brush.
 
First, because I had no idea how long she had been on the shelf, she got a thorough washing


Using the palest flesh-tone paint I have, I covered her face and decided to make her a blond.
 
 
I got her all painted, then realized something was missing.  I rummaged through my stash of whatnots and found these.
 
 
I had bought these Swarovski crystals.  Yes, they say Swarovski on the package, for crafts.  Normally $10.00 per package, they were now $3.00.  When I bought them, I really had no plan for them.  It just seemed too good a buy to pass up.  As I took these out of their drawer, I realized they were the perfect color scheme for my little green angel.
 
Gluing with Gorilla glue and Super glue is not particularly fun.  I'd get too antsy and have to stop, so that's why this took longer than I intended.  But, here she is.  Glitz on her wings...


Glitz on her hem...
 
 
A necklace of crystal about her throat and a little diadem on her head.
 
 
Here she is all done.  Before and after.

 
Next, a Broken Angel.  I also found her at Deseret Industries.  She is Enesco, numbered and named, but damaged beyond repair.
 

Surely, there must be a way to reclaim this pretty figurine who once had wings to fly.


Sunday, February 28, 2016

My Three Angels

Well, here they are.  My next project.  They are 3 angels I rescued from a Dollar Tree store.  As you can tell, they are whitish and brownish and altogether boringish.  So let's get to work.


First order of business is to select colors.  I decide to be quite vibrant.  They will not be a uniform color but all different.  Orange.  Purple.  Green.


They all got the base white paint cover, then I painted the wings a metallic white with a little blue in it.  The dresses are painted of pearlized acrylic craft paint.  I learned a very valuable lesson here.  Pearlized paint needs a base undercoat of the color you want, otherwise you are painting layer after layer after layer of pearl to get the color solid.  Once this was done, I was ready for the details.


Little Miss Orange Angel got dots on her wings, dots on her sleeves, dots on her little dove, who also got a gold beak and brown eyes.  The original face had these slanted impressions for eyes.  I filled them up and added dot eyes and a mouth.  I hard a hard time with making uniform eyebrows, so I made them out of dots.  It works.  Gloss black paint for her hair and a nice red mouth.


For the bottom of her dress, I did more and  more dots, some strait and some in a zig-zag. You may also see some little rhinestones I added for sparkle.  And here she is all finished.
 
 
Little Miss Green Angel got dashes on her wings and more dots on her sleeves and collar.  The star was painted with metallic gold.
 
 
Her dress got a star pattern, big and small, with rhinestones added for sparkle.


On the bottom I did a three color "flame."  Not sure it worked, but there it is.  And here is Little Miss Green Angel all finished.
 
 
I really went bonkers with the dots on Little Miss Purple Angel. 
 
 
The book now has a brown cover, gold edging on the leaves, and on the page I added some gold notes to the white enamel.  When I first started this swirl, I wasn't sure it was going to look ok, but I just kept adding more and more color, green stippling, yellow dots and pink dots.  I like it.
 
 
On the other side of the swirl, I painted dot flowers and put rhinestones in the middle of them.
 
 
And here is Little Miss Purple angel all finished.
 
 
I found some small jewelry clamps that I thought might look like feathers.  I folded them over and glued them on to look like feathers in their hair.

All finished, before and after.  I think it's an improvement. 


Easter is coming.  Those two other bunnies from last year are calling my name.