I have already registered for a tree for the Festival of Trees. So I'm committed now.
I wasn't going to do a Festival of Trees this year. I was going to concentrate on other charities, however, as I mentioned at the first of the year, I got an idea. A horrible. Awful. Idea.
What if I did a tree based on the artwork of Mary Englebreit? Oh, that would be soooo cute. I love her artwork. I'm always snapping up her calendars.
And if I did do this tree, wouldn't be a hoot to re-create "Life is Just a Bowl of Cherries."
I gushed and laughed over the idea. But no. I'm not doing a Festival of Trees tree....
Never go to Home Goods when ideas are floating around in your head. Because then you are sure to find...
So, yes, I bought it, brought it home, wrapped it up in plastic and stuck it under a table in my office while I went on a spending binge at Amazon.com, Wal-mart and E-bay. It was February and I was buying Christmas stuff!
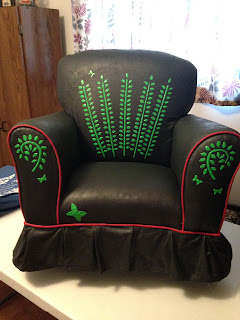
So, here is my make-over. I discovered spray on fabric dye. I have never used the stuff before and thought I knew what I was doing. I had plan A all mapped out. I'd purchased some stuff on line and ran some tests. OK. I'm prepared, but instead of a black chair, like it is in the picture, I planned to make it dark green. Thought that might be more Christmasy.
I started by painting the piping red, just like it is in the picture. Instead of using the spray, this I painted on with a brush, for better control.
I used packing tape to protect the existing fabric. When the piping was painted, I then did a background color of light green, for the greenery on the chair. We now look like this.
I had purchased a specialty paper punch of a small leaf. This was a method that did and didn't work.
I placed the clear packing tape on top of label paper that had an adhesive background. I made slices for the stems and hand drew the curly stem, paper punching the leaves.
Very carefully, I placed my stickers on the chair. Originally, I was only going to do three stems on the back of the chair.
I put masking tape over the red piping and got out my dark green spray dye. I didn't have enough! Plan B. I ran to JoAnn's Fabric store where I had bought the red dye. They had emerald green spray paint - but - horrors, it was sparkly.
AND I had splotches from the earlier green dye. This was a disaster! Plan C! I added two more rows of stems and leaves to match the original.
I ran to JoAnn's again and this time bought black fabric paint that is applied with a brush. It was dark and gooey, reminding me of something out of an oil can, but thicker. I painted it on all over. I later found out I could have thinned it with water.
When the paint was dry, now came the reveal. It was time to take the stickers off. Rats. Another disaster. For the most part, the paper had stuck to the underlying paint. I couldn't get it all up, but left a regular paper trail.
Plan D. Back to JoAnn's and this time I bought the old fashioned Tulip slick stuff in a big bottle, to make sure I had lots.
I kept telling myself to be patient, but I struggled with maintaining a steady hand as I painted in the stems and leaves with green goo. Finally, I just decided, it didn't have to be perfect. It just had to be DONE! Once I removed all the masking tape from the piping, I used a paint brush to fill in the gaps and do touch ups.
Today, July 30, 2016 it is finished! Here is the before and the after.
And that is all I am going to say about that!
Next - Tea for Two with a Cherry on top. Also for Festival of Trees.
I tell ya! Home Goods is dangerous when your brain is cooking up ideas.


